The Bounty and Economics of May

Did you know it’s June 1st today?  It totally sneaked up on me. I swear it was just 2-3 weeks ago that I wrote my last post and packed my bags for my Hawaii vacation.  Guess not.

The Pacific Northwest has been blessed with some amazing weather this year.  Normally in Seattle, summer doesn’t start until the 4th of July, but this year we hit 80 degrees in May!   I only had to cloche my tomatoes for a week (I cloche at night until the nighttime temps are safely above 50 degrees).  I’m blown away by how great my garden looks.

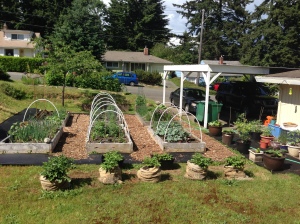
The homestead May 2014

The homestead, May 2014

This spring I have been keeping myself busy in the garden.  The hubs got inspired one Saturday and laid a whole bunch of landscaping fabric, took some leftover mulch from a neighbor and started mulching between our beds.  The interesting part is apparently there are places that will give out free bark mulch.   In Seattle there is a company who will deliver free bark mulch if they have to cut down trees for Seattle City Light in your neighborhood; there are also many arborists who will give out their bark mulch for free or at a small cost.  The mulch we got was pretty rough, but I’ll take free over pretty any day.

The burlap sacks in the photo are growing potatoes.  I can’t bear the thought of using an entire bed to grow potatoes so I’m trying my hand at the burlap sacks.  The hardest part is knowing how often to water them.  Potatoes are notorious for being sensitive to over-watering.

The front bed full of raspberries, rhubarb and volunteer sunflowers

The front bed full of raspberries, rhubarb and volunteer sunflowers

Every day I feel as though I’m drowning in weeds, raspberries and volunteer sunflowers.  Please trust me that if you grow enormous sunflowers and you choose not to take them down in a timely manner, the critters in your neighborhood will spread the seeds for you.  I have sunflower starts in EVERY SINGLE GARDEN BED.  I do love my sunflowers though, and this spring a handful of neighbors have stopped by to ask me if the sunflowers will be back this year.  Clearly, I can’t let them down.

Lots of raspberries

Lots of raspberries

The raspberries are also a new adventure.  Last year I bought yellow raspberry starts from Burnt Ridge Nursery, and clipped some red raspberry starts from my dad.  The starts from my dad have been in my family for generations. They come from Idaho, and the only other place I know where they grow is at the Monastery of St. Gertrude in Cottonwood, Idaho.   The Monastery has a raspberry festival every year to celebrate.  I keep meaning to go, but haven’t yet.

But I digress, I had no idea how much work it is to grow raspberries!  They send up hundreds of shoots that I’ve had to pull.  I do a walk through every 3-4 days and pull out the extras.   I need to talk to my dad more about his trick, I think he goes along the edge of his raspberries with a sharp spade to cut all the underground sprouts.

The volunteer sunflowers are already 2 feet tall

The volunteer sunflowers are already 2 feet tall

I have continued to weigh all of my harvests this year, but with some modifications from last year.  I’m not going to weigh any of the herbs.  I already know those are financially worth it to grow, plus it’s way too easy to pad my numbers by harvesting pounds of herbs that I’ll never be able to use.

I’m also trying to categorize everything by varietal.  For example, instead of just saying spinach, I specified if it was the Red Kitten or the Bloomsdale.  I’m hoping this will help me narrow in on what we like best and grows best in my garden.

This year in May I harvested $56.74 worth of produce.  It was mostly spinach, arugula (I ended up making a huge batch of arugula pesto when it all started bolting in the heat) and rhubarb.  In 2013 I harvested $94.10 worth of produce, but it was about 75% herbs so I think I’m actually ahead of last year.

I’m saving the best for last.  Today I harvested some of my Santé shallots!  They weren’t necessarily ready to be harvested yet, but I was in the mood to put one in my kale.  It tasted delicious.
My first iris

Our first iris

Baked Oysters

I’m always on the look out for new oyster recipes.  We get to harvest them fresh off the beach throughout most of the year and only getting to eat your oysters raw, fried or smoked can get old.  I love oysters, I love harvesting them and I think our shellfish licenses are one of the most economical purchases the hubs and I make every year.  Hence, I’m always looking for new ways to use up my oysters.

DSC03742

My cookbook Northwest Essentials: Cooking with Ingredients that Define a Region’s Cuisine by Greg Atkinson is a great resource for oyster recipes and has some great ones that I used as inspiration.  My only issue with his recipes is that he must buy his oysters with the shell on (you’re not allowed to take the shells off of the state beaches in WA) and puts them straight onto a BBQ.  I’m not about the pull out the ol’ grill in the winter rain so I improvised.

IMG_5493

Baked Oysters with Greens, Cheese and Olive Oil

Note:  This is an extremely flexible recipe, you basically use what you have on hand and make it work.  Consequently, I didn’t include any measurements, I just use what looks good to me.  They always taste good.

Ingredients:

Greens – I’ve used chopped spinach, arugula, and chives.  I think you could use just about anything.  Rinse them well and give them a rough chop.

Cheese – You want a flavorful cheese that will melt nicely.  I’ve used grated parmesan and grated pecorino.  I think a sharp cheddar has potential as well as a dollop of goat cheese.

Olive Oil

Fresh Raw Oysters – I usually do at least a dozen at a time

1. Set oven to 450 degrees

2. On a baking sheet place either small ramekins, small gratin pans or oyster shells.

4. In each vessel put down a layer of greens, then put 1-4 oysters on top (in a single layer).  You can also put the greens on top of the oysters if you forget to put them underneath like I did.

5. Sprinkle with cheese

6. Put 1-2 teaspoons of olive oil on top of the cheese

7. Feel free to add some salt and pepper

8. Bake for 10-15 minutes until just barely done.  I like mine just barely cooked all the way through.

9. Serve hot.  Works well as an appetizer or a side dish.

I apologize for not having pictures of them after they come out of the oven.  The get eaten up so quickly I never seem to have time to take photos.

Right before going in the oven


Is it springtime yet??

Last Saturday was one of my personal holidays.  The Seattle Tilth Early Plant Sale was held down in Sodo.  For weeks I’ve been working on my spreadsheets, trying to determine exactly how many plants I can cram into my beds and containers.  I’ve been up late reading over the lists of plants that were going to be there and re-writing my list over and over again.  I think it’s my coping mechanism for getting through the late Seattle winter glum.  Going to the tanning bed is now frowned upon, and I don’t have a trip to Hawaii till April so I’m left with fantasizing about my summer garden to get me through.

Blooming shrub in my yard...not sure what it is

Blooming shrub in my yard…not sure what it is

This year I’m doing a modified square-foot gardening method.  I have a tendency to put my plants too close together and I think I’ll have better results if I space them out more appropriately.  The whole square foot gardening thing seemed a little too kitschy and “hey you need to buy all this stuff to make it work” which I’m not down with.  I refuse to buy special soil and replace it every couple years.  So, I modified the idea to fit my style.  The hubs built me a wooden one square foot frame with wood screws at 1 inch intervals around the sides.  I used the frame to mark out square foot intervals in my garden.  Long rubber bands were put on the screws so that I could adjust the internal squares to be 2″x2″ or 3″x3″ or 4″x4″.   It worked like a charm.

On Saturday I purchased my spring crops.  I’m trying broccoli again this year, specifically Umpqua and Early Dividend varieties.  In 18 square feet I put in 10 plants.  My previous attempts at broccoli have been mediocre I think because I had no idea I wasn’t going to be harvesting until June or July, and I crowded them.  This year I’m giving them room (and time) and then will use the bed for winter crops that will be planted in late summer (shallots and garlic).

Beautiful shallots!

Beautiful shallots!

The biggest purchase of the day was leeks.  2 containers of Bleu de Solaize, 3 of King Richard and 1 Carentan.  I know I should be planting my leeks from seed, but I’m feeling lazy this spring so I bought starts.  The square gardening peeps say  there should be 9 leeks per foot which I think is ridiculous, so I planted them 16 per foot, which still seems a little far apart but we’ll see.  Leeks keep well in the garden, the last of my leeks planted in March 2013 were picked in January and made a fabulous leek risotto.

Broccoli, arugula and spinach

Broccoli, arugula, leeks and spinach

My favorite purchase of the day came from Burnt Ridge Nursery.  An Olympian fig, Bay Laurel (large one) and Native Star Huckleberry have joined my small but growing collection of trees and shrubs.  I’m always thinking about things I can grow that are native to the Pacific Northwest and are not readily available for purchase.  The Olympian fig is an heirloom that was found in growing in Olympia, Washington.  It’s great for the Pacific Northwest and I’ve been told and read that it’s one of the tastiest and sweetest figs you can find.  I’m so excited!

My new Native Star Huckleberry

My new Native Star Huckleberry